With so many different materials to choose from, it can be difficult to decide which is best for your shed roof. We're here to help!
Are you looking to change the material on your shed roof? Perhaps your roof is leaking and you’re looking for a suitable watertight replacement, or maybe you just want to give it a fresh new look! Whatever the reason may be, you might find yourself asking; what is the best material for a shed roof? With various options on the market, it can be tricky to find the perfect one. Fear not, we’re here to evaluate three of the most popular options!
Let’s start with the all-time classic option, felt...
Shed Roofing Option: Felt
Felt is traditionally one of the most popular shed roofing materials, why? It’s easy to fit, it’s cheap and it does the job - sort of. That is until it starts to show wear and tear. Unfortunately, whilst felt might be a cheaper option, it’s only a short-term solution and before long you will find yourself needing to patch up your roof and eventually look for a more solid, weatherproof alternative.
Felt Pros:
- Cheap
- Easy to fit
Felt Cons:
- Very susceptible to wear and tear
- Not a long-lasting solution
Conclusion: felt is a cheap option short-term but may end up costing you more down the road
Shed Roofing Option: Bitumen Sheets
Next up, we have bitumen sheets, which are a strong and durable option for your shed roof. Whilst they are more expensive than felt, they’re still an affordable solution that will last longer and keep your outdoor structure more watertight.
Our ONDULINE CLASSIC sheets are the original bitumen corrugated roofing sheet but, unlike some others, ours are made from 50-60% recycled materials, making them eco-friendly too.
Bitumen Sheets Pros:
- Easy to fit Weatherproof - withstanding snow, rain and harsh weather
- Long-lasting (our CLASSIC sheets come with a 15-year guarantee!)
- Eco-friendly
- Lightweight
- Aesthetics
Bitumen Sheets Cons:
- More expensive than felt - but longer lasting!
Conclusion: If you’re looking for roofing that is guaranteed to be watertight and last for years to come then bitumen sheets sound like the perfect option for you.
How do you install bitumen sheets?
Our corrugated roofing is easy to install, - you can even install it over the top of existing felt! - just follow these steps…
- Lay the sheets over the gutter line with an overhang and lay them in the opposite direction to the wind
- Lay your second row so the first sheet is parallel to the corrugations but not in line with the first
- Fix the sheets at the eaves, overlaps and ridges with the correct fixings
- Fix a verge to the edge for ultimate aesthetic, waterproofing and wind resistance. Fix to the sidewall first and then the roofing sheets with an overlap
Et voila! You can find out more by reading our full ONDULINE CLASSIC installation guide.
Bitumen Sheets Inspiration
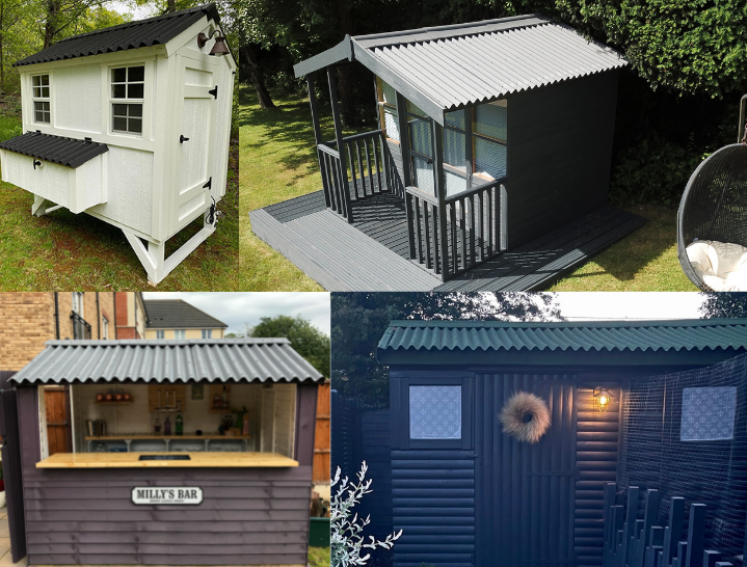
Sheds, workshops, animal pens and more!
Check out these wonderful sheds, workshops and animal pens all using our bitumen sheets Onduline CLASSIC.
Shed Roofing Option: Shingles
The third roofing material option is shingles which are designed to cover sheds, garden rooms, garages, verandas and outbuildings. Shingles are a fantastic option for your roof thanks to their durability and resistance impact. They’re suited to all weather conditions and our BARDOLINE shingles are super low maintenance and superbly watertight, they will give you the longevity you need from your shed roofing.
Shingle Roofing Pros:
- Highly durable
- Lightweight
- Virtually maintenance-free
- Long-lasting (our BARDOLINE shingles have a 10-year guarantee)
Shingle Roofing Cons:
- More expensive than felt
Conclusion: Shingles are a fantastic solution, and our shingles can be used for all different types of leisure structures thanks to flexibility and ease of installation. If it’s durability and longevity you need - these are your best bet.
How do you install shingles?
- Fit the roof shingles starting from the bottom (= the eave) to the ridge. Start each row by the gable end.
- 1st strip: Prepare the first strip by cutting the headlap of the shingles. Shorten the shingle of one tab so that the junctions are not aligned with the 1st row.
- 1st course: Start with a complete shingle and continue fitting the roof shingles on the first row.
- 2nd course and following ones: Shorten the shingle of a tab. Fix the roof shingle so that the lower end of the headlap is aligned with the top of the 1st-row shingle cut out.
- For the 3rd course, shorten one tab.
- For the 4th course and the following ones, always shift the shingle fitting by shortening the 1st shingle of a raw by half a tab
- Glue the rakes with ONDUMASTIC for a better seal.
- Cut shingles at the cut-outs to form individual shingle ridge pieces.
- Fix the ridge in the opposite direction to prevailing winds.
- Fasten them with 2 nails on each side and seal them with putty or silicone.
View full installation details and steps in our guide to installing BARDOLINE roof shingles here.
Shingles shed roofing Inspiration

Our BARDONLINE customers!
Check out these amazing projects using our BARDOLINE roof shingles.
Ready to start your shed roofing project? Our lightweight and easy-to-install roofing can be purchased via our eShop as well as select ranges available via The Range, Amazon, and Wickes.
Discover the full range at onduline.co.uk.