HOW TO INSTALL ONDULINE CLASSIC
Like all of Onduline's roofing sheets, ONDULINE CLASSIC® is made from a flexible and easy to handle material, ensuring an easy and longlasting solution for your roof.
The Onduline material does not contain any asbestos, or harmful chemicals, and is free from metal so it will never rust!
ONDULINE CLASSIC is our most popular corrugated roofing sheet which is ideal for waterproofing a range of buildings, from garden outbuildings, like sheds and workshops, as well as horse stables, agriculture buildings, like barns and animal shelters. Thanks to their lightweight (about 3.4 kg/m2) and their great mechanical flexibility, ONDULINE® CLASSIC sheets are easy to install and have a 15-year waterproofing warranty.
Did you know, you can install ONDULINE CLASSIC sheets on fence panels to give your garden fence the stylish aesthetic it deserves. Find out more here
CLASSIC Installation Conditions
- Minimum pitch: 5 degrees
- Installation is possible on full deck or battens.
- Pitches of > 5° - 10° : Full deck is required
- Pitches > 10° : Can be installed on battens with a maximum spacing of 43 cm
- Pitches > 15° : Can be installed on battens with a maximum spacing of 61 cm
Installation Steps: ONDULINE CLASSIC

Step 1: Lay the sheets
Start laying sheets over the gutter line with max 7 cm overhang, lay sheets in the opposite direction to the prevailing winds.
The second row has to be started with half a sheet cut parallel to the corrugations, to misalign side overlaps.
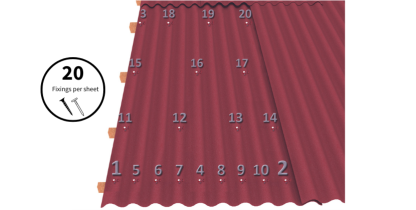
Step 2: Nail or Screw the sheets
Approximately 20 fixings should be used per sheet.
Every corrugation should be fixed at eaves, overlaps and ridges.
Every second corrugation has to be fixed at the intermediate purlins.
The fixing at the intermediate purlins has to be staggered.
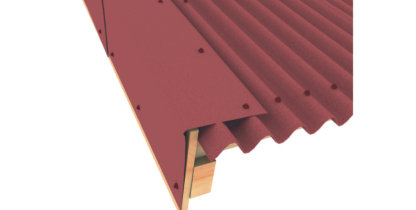
Step 3: Fix the verge
For complete watertightness at the edges of your roof and for an optimised aesthetic and wind uplift resistance, use an ONDULINE VERGE element.
Fix it first into the sidewall of the roof, then on the top of the corrugation.
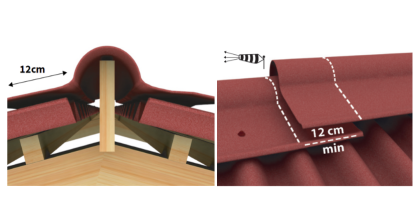
Step 4: Secure the ridge
Use a ridge batten to support the Onduline ridge piece as shown. The ridge element has to overlap the ONDULINE® sheet min. 12 cm.
The ridge elements are fixed in opposite direction to the prevailing winds.
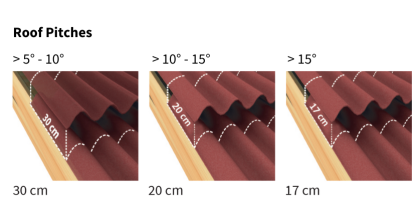
Step 5: End Overlap
Ensure the correct end overlap is secured depending on the pitch and structure of your roof.
The lower the pitch the more overlap is required.
- Minimum 30 cm overlap for roof pitches 5° - 10°
- Minimum 20 cm overlap for roof pitches 10° - 15°
- Minimum 17 cm overlap for roof pitches > 15°

Step 6: Side overlap
Ensure the correct side overlap is secured depending on the pitch and structure of your roof.
The lower the pitch the more overlap is required.
- Minimum 2 corrugations overlap for roof pitches 5° - 10°
- Minimum 1 corrugattion overlap for roof pitches above 10°
Download the full installation steps below or watch the video
CLASSIC Installation Conditions
- Minimum pitch: 5 degrees
- Installation is possible on full deck or battens.
- Pitches of > 5° - 10° : Full deck is required
- Pitches > 10° : Can be installed on battens with a maximum spacing of 43 cm
- Pitches > 15° : Can be installed on battens with a maximum spacing of 61 cm