
Embracing sustainability and innovation in roofing
24 April 2024The push towards sustainability and innovation in roofing is becoming increasingly vital for professional contractors. Beyond traditional practices, the integration of sustainable roofing products is essential to future-proofing projects. By adopting forward-thinking solutions, contractors not only enhance their environmental credentials, but also align themselves with a vast market demand for eco-friendly solutions.
Furthermore, forward-thinking roofing contractors recognise the growing need for adaptable roofing solutions that can seamlessly integrate with sustainable technologies, such as solar panels. By designing roofs with future adaptability in mind, contractors not only meet current environmental standards but also ensure the longevity of their projects in a time where renewable energy sources are becoming increasingly prevalent.
Here, Ardit Strica, Technical Manager for Onduline Building Products, explains how Onduline’s ISOLINE LOW LINE roofing system is the perfect blend of sustainability and innovation, ensuring contractors can cater to the evolving demands of the market.
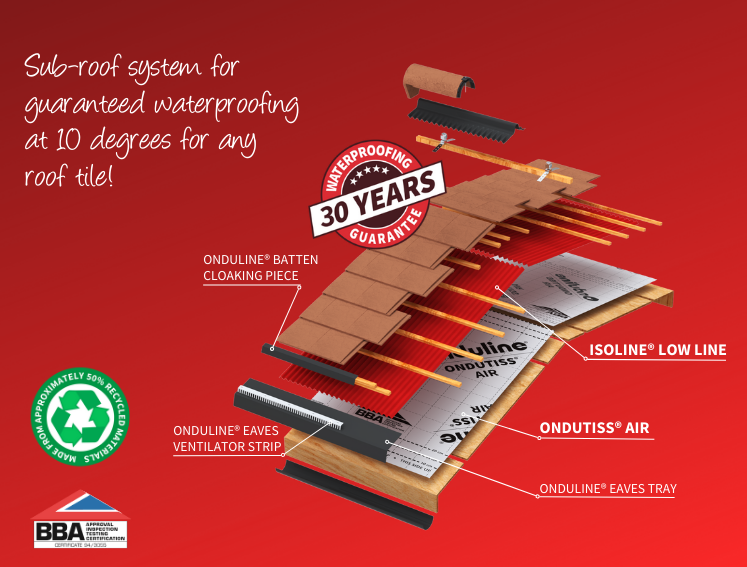
ISOLINE LOW LINE
Onduline's ISOLINE LOW LINE sub-roof system provides durable protection against water ingress with added environmental benefits. Incorporating 50% recycled cellulose fibres and free of asbestos and hazardous substances, it boasts impressive green credentials.
Tailored for low-pitch roofs, as low as 10 degrees, this lightweight bituminous underlay sheeting is installed beneath roof tiles, shielded from direct UV exposure and environmental elements. This ensures a long-lasting waterproofing solution.
Employing roof tiles as a secondary defence allows for a significantly lower roof pitch than tile manufacturers recommend. This not only meets the demand for maximising living space by minimising the roof void but also extends the use of traditional tiles in areas previously deemed impractical, like extensions or large roofing projects. The result is a property with enhanced aesthetic appeal.
1. Installation on battened roofs
- Prepare the roof eaves detail to match the roof pitch by incorporating a fascia board, a tilting fillet, and an eaves tray support board where needed
- Install and secure the eaves tray onto the roof structure
- When using a membrane, place it between the rafters with a slight drape (recommended maximum of 15mm) and on top of the eaves tray, ensuring a minimum 100mm overlap between the two. Avoid exposing or extending the membrane past the top fascia board
- Install support battens using the tile gauge, adhering to the tile manufacturer’s recommended distance between battens. Ensure support battens are at least 50mm x 38mm in size and securely fastened to rafters
- Install ISOLINE LOW LINE sheets, beginning at the bottom of the roof and aligning them parallel to the fascia board using the eaves line as a guide. Each sheet includes two horizontally embossed overlapping guidelines, with a recommended horizontal overlap of two guidelines (approximately 210mm) and a vertical overlap of two corrugations (approximately 100mm)
- Stagger the sheets similar to tiling, starting the second row and every alternate course with a vertically cut sheet, creating a broken bond sheet pattern. Lay tiling battens over the ISOLINE sheets, aligning them with the support battens, and secure the system with suitable nails or screws
- Use smooth shank fixings with a minimum head diameter of 3.5mm. Fixings should only penetrate the sheets at the apex of the corrugation and be spaced approximately every 300mm along the length of the tiling batten
- Ensure fixings penetrate the support battens by a minimum of 15mm
- Fix the ventilator comb between the eaves battens and complete the installation by overlaying the eaves battens with a batten cloaking piece.
- Opt for deep flow guttering to minimise the risk of rainwater overshooting.

2. Installation on fully boarded roof
- Utilise timber decking with a minimum thickness of 20mm to fully cover the designated area
- Install eaves trays securely onto the boards
- If a membrane is part of your roofing system, lay it next. Ensure a minimum overlap of 100mm between the membrane and the eaves tray. Avoid extending the membrane beyond the top edge of the fascia board
- Adhere to the installation instructions provided for a battened roof

3. Installation for a warm roof
- ISOLINE LOW LINE can be installed above a warm roof, providing the proper fixings and ONDUTISS vapor-permeable membrane are utilised
- Integrate adequate ventilation into the warm roof system to enhance performance
- Please be aware that our secondary roofing system functions as a cold roof and cannot serve as an integral component of a warm roof section but can be installed above it

4. Roof details
- At ridges and hips lay roofing membrane across the butt joint in the sheets and dress down a minimum of 300mm either side of the ridge. When using ventilation products, the membrane can be trimmed instead at the ridge level to allow the flow of air
- For side wall abutments use a conventional 2-3 layer waterproofing system as shown on the image above. Note: the top-most flashing layer must be chased into the wall.
- For the end wall abutment, fold the roofing membrane upwards on to the wall (approx. 100mm). Install Onduline Apron Flashing Piece. The tile battens and tiles can then be fixed, and a two-part lead flashing can be applied. Abutment ventilators can also be used.
5. Watertight pipe/vent penetration
- Lay the sheets, maintaining a gap equivalent to the width of the pipe
- Horizontally overlap the ISOLINE sheets by aligning the embossed lines on the top sheet with those on the bottom sheet, providing approximately 220mm end lap coverage. For side overlaps, use two corrugations (approximately 100mm)
- Position the pipe flashing piece, ensuring a 150mm overlap between the flashing and the bottom sheet. For side overlaps, make sure the flashings cover a minimum of two corrugations on both sides
- Overlap the top ISOLINE sheet, ensuring a minimum of 150mm overlap between the flashing and the top sheet

6. Solar integration
- To seamlessly incorporate solar panels into the ISOLINE LOW LINE roofing structure it’s best to use a Hanger Bolt fixing or a similar alternative
- Choose bolts of varying lengths based on the specific PV bracket and tile type
- Thread the bolt until the seal establishes solid contact with the ISOLINE sheet.
- Exercise caution to avoid over-tightening and causing the collapse of the sheet corrugations.
- Penetrate the ISOLINE sheet exclusively at the top of the corrugations
- Always affix structural components to rafters
- If fixing is required in the absence of a rafter, incorporate an additional structural component (rafter or equivalent).

Note: When securing solar panel brackets, treat the ISOLINE sheets solely as waterproofing components, not as structural elements. Rafters typically serve as the primary structural components in a pitched roof.
Watch the installation video below for more guidace.