ONDULAIR DRY RIDGE KIT
Installation steps for ONDULAIR® DRY RIDGE KIT.
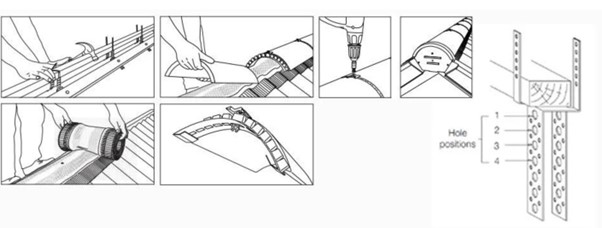
- Fix the ridge batten support straps to each truss or rafter using clout head nails.
- Use 25x50mm treated roofing batten for the ridge batten. For most tile profiles one or two 50mm battens will suffice.
- Secure the battens into the ridge batten strap supplied, there are sufficient ridge batten straps in each 6-metre pack to fix at 450- & 600-mm centres.
- Using 25x50mm tile battens to make up to the appropriate height of the ridge, make sure that the fixing screws penetrate by at least 25 mm.
- Fix the top tile battens so that the minimum head lap of the ridges covers the top courses of the tiles and the lap is maintained.
- Nail the tile battens through the ridge batten straps. Lay and secure the top courses of tiles/slates in the appropriate manner.
- Roll out the ONDULAIR® Dry Ridge Kit Roll along the centre line of the apex and tack to the ridge batten.
- Secure in place every 300mm with clout nails or rust proof staples. Any joins should be overlapped by a minimum of 75mm.
- Peel off protective paper backing from the adhesive strip and press down firmly onto dry, clean tiles all the way along the ridge. For deep profiled tiles, additional care is needed to work the edges of the ridge roll neatly into the tile profiles.
- To maintain an air path when using with flat tiles or slates, take care not to flatten the corrugations in the ridge roll by over dressing or excessive tightening of the fixing screws.
- At the gable end (also Hip end) place a block end ridge over the centre line of the apex. Fit a ridge union under the open end of the block end ridge tile. Secure the other end with a drive screw into the ridge Locate the block end ridge tile over the centre of the roll and secure it with a screw (it may be necessary to drill a hole in the ridge approximately 30‐40mm from the block end for this purpose.) Continue along the ridge fixing each ridge tile with the plates and screws provided. At the top of the hip, you will have to mitre cut the hip tiles for a neat finish.
- Note: The drive screws can be driven in most of the way if very careful using a hammer but must be finished off using a screw driver to ensure the ridge fixings are a tight fit against the ridges.