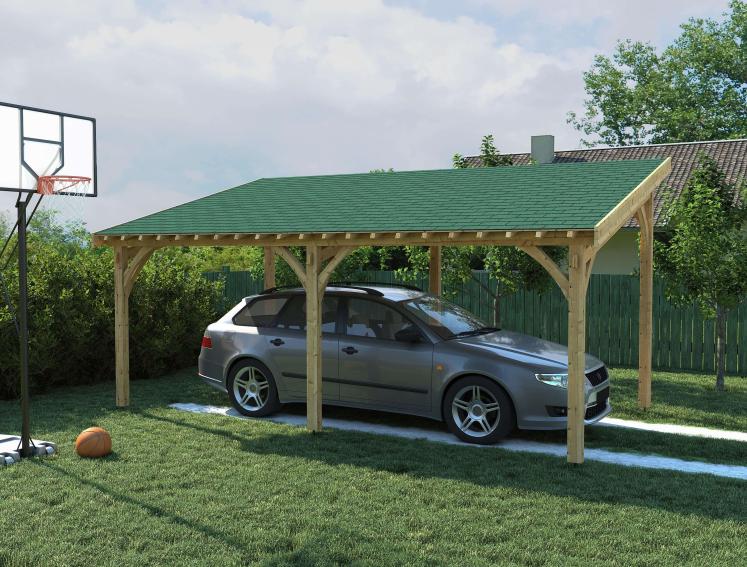
Carports are the perfect addition to your home as not only do they help protect your car from the elements but they add curb appeal too! Read our tutorial below on how to build your own.
Are you thinking about building your own carport but not sure where to start? Don’t worry! We’ve got you covered with everything you need to know when it comes to building your own carport. Let’s get started with a few key considerations before we move onto the build itself…
What is a carport?
A carport is essentially a structure that has been constructed to protect your vehicle from the elements by providing shelter! They are usually supported by columns and posts and are a cheaper alternative to a garage.
Are carports worth it?
Yes, most definitely, and for a number of reasons!
Firstly, sheltering your vehicle from the elements will hopefully help to reduce maintenance costs. Not only this, carports can provide the perfect space to clean your car (especially with the UK’s unpredictable weather) and charge your car too - with electric vehicles becoming increasingly popular, a carport is a great investment. And last but not least, a carport will add curb appeal to your home, and may make your property more desirable if you’re considering selling down the line.
What roofing is best for a carport?
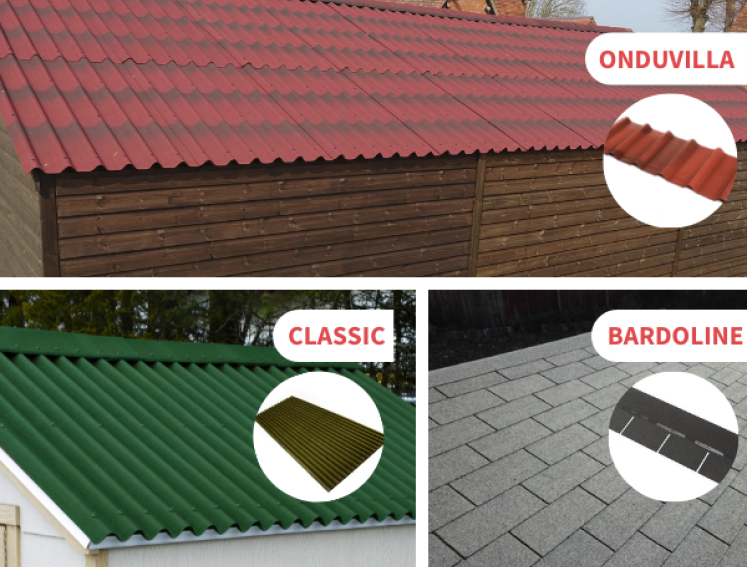
Shingles, tiles or sheets?
Well, as you’ve asked...our roofing systems are ideal for outdoor structures such as carports, as well as pergolas, sheds and other outdoor buildings and we have a wide range of roofing products which are suitable from our BARDOLINE roof shingles to our ONDUVILLA roof tiles for a ‘tile’ look and our ONDULINE CLASSIC roofing sheets.
Why choose Onduline roofing for a carport?
There are so many reasons!
Our favourite roofing for a carport is our BARDOLINE roof shingles and here are just a few of the reasons why they make for the perfect carport roofing…
- The shingles are lightweight and easy to handle
- No specialist tools are required and installation is straightforward
- They’re weatherproof and have a high resistance to hail
- They’re resistant to hot temperatures too
- They come with a 10-year guarantee
- And they’re affordable!
If you’re after something a little different in style, our other roofing solutions will make for a great carport roof too so why not take a look at our extensive range of corrugated bitumen roofing sheets.
Do I need planning permission for a carport?
Whenever you’re carrying out any construction works on your home it’s always a good idea to consider planning permission and the steps you may need to take. Fortunately, carports do not generally require permission if they follow these rules…
- The carport is being used for domestic (non-business) purposes
- Your carport is less than 4 metres tall
- Its eaves height is less than 2 metres if it is 2 metres or less from the edge of your property
- It is more than 3.5 metres from the boundary at the rear of your house (if that boundary has a road)
- It does not extend beyond either the side or principal elevations of your house as it faces the road
- It doesn’t exceed 50% of your homes land
If in doubt check with your local planning authority and always check for up-to-date information. The above is a guide only.
How to build a freestanding carport
- Before you get to the roofing part of your carport you will of course need to construct the base. To start with, plan your layout! Mark it out on the ground - for an average-sized car a space of 16x9 feet should suffice but it does depend on if you’re building a single or double carport. Then level out the ground and remove any grass.
- Next, you will need to install your posts! To do this, dig holes that are a minimum of 2 feet dip (consider going deeper if you live in a windy part of the country!) and make sure half of your posts are shorter than the other half so your roof will have a minimum of 5 degrees pitch. Set your wooden posts by filling the space around the posts with concrete and allow the concrete to harden for at least one day before nailing on the beams.
- Now to fasten the beams, you’re essentially building a rectangular box! Secure a supporting crossbeam flat on the top of your shorter corner posts and repeat this step for your higher corner posts. Then add the rafters - these should be secured with equal distance in between and based on the size of your roofing sheets to make sure your carport is watertight!
- And then we move onto the fun part, roofing! Your installation will differ depending on your choice of roofing so make sure to read all about how best to install your roofing before you get started. You can find our installations guides here and we have some handy how-to videos too!
How do I install a carport roof with Onduline’s BARDOLINE shingles?
The good news is all of our roofing is DIY-friendly! To install our BARDOLINE roof shingles you will need a hammer, cutter, metre and level. And that’s it!
Note: If you’ve followed the steps above, you’ll also need to install a deck on top of your rafters ready for the BARDOLINE shingles.
Here’s a step-by-step installation guide for our BARDOLINE roof shingles:
1. Preparation
- Before fixing the shingles, make sure the structure is plain to avoid any irregularity (an unattractive and potential source of infiltrations).
- Cover the entire roof with ONDUTISS starting from the bottom of the roof - to ensure water tightness.
- Ensure a horizontal overlap of 10 cm and 15 cm at the ends.
- Securely fasten with staples and large-headed nails.
2. Fastening
- Guide wide-headed BARDOLINE nails so heads are fastened straight and deep without damaging the shingle.
- For important slopes (> 60 °), add additional nails and use putty/silicone to seal.
3. Installing
- Fit the roof shingles starting from the bottom (= the eave) to the ridge. Start each row by the gable end.
- 1st strip: Prepare the first strip by cutting the headlap of the shingles. Shorten the shingle of one tab so that the junctions are not aligned with the 1st row.
- 1st course: Start with a complete shingle and continue fitting the roof shingles on the first row.
- 2nd course and following ones: Shorten the shingle of a tab. Fix the roof shingle so that the lower end of the headlap is aligned with the top of the 1st-row shingle cut out.
- For the 3rd course, shorten one tab.
- For the 4th course and the following ones, always shift the shingle fitting by shortening the 1st shingle of a raw by half a tab
- Glue the rakes with ONDUMASTIC for a better seal.
4. Ridge
- Cut shingles at the cut-outs to form individual shingle ridge pieces.
- FIx the ridge in the opposite direction to prevailing winds.
- Fasten them with 2 nails on each side and seal them with putty or silicone.
If you would prefer, you can also use our BARDOLINE detail strip for your ridge.
Click here for our BARDOLINE installation guide!
And there you have it, your very own carport to enjoy for years to come!
Ready to start your carport build project? Our roofing can be purchased via our eShop as well as select ranges available at Wickes.
Discover the full range at onduline.co.uk.