HOW TO INSTALL ONDULINE EASYFIX COMPACT
Like all of Onduline's roofing sheets, ONDULINE EASYFIX® COMPACT is made from a flexible and easy to handle material, ensuring an easy and longlasting solution for your roof.
The Onduline material does not contain any asbestos, or harmful chemicals, and is free from metal so it will never rust!
ONDULINE EASYFIX COMPACT corrugated roofing sheet has a modern profile which looks similar to a trapezoidal profile. The roof sheets are made up of 6 corrugations and 5 flat, giving your roof a stylish finish. Compatible with ONDULINE EASYFIX 2m sheets, these compact sheets are 1m in length making them ideal for smaller diy roofing projects. Whether a child's playhouse, small garden shed for storing tools, an animal house or wood storage building, ONDULINE EASYFIX is perfectly compact for ease of construction, they are easy to transport in a standard car boot, and easy to handle. Thanks to their lightweight (about 2.25 kg/m2) and their great mechanical flexibility, ONDULINE® EASYFIX COMPACT sheets have a 10-year waterproofing warranty. A fast waterproofing solution for your outbuilding and a premium upgrade to standard shed felt.
EASYFIX COMPACT Installation Conditions
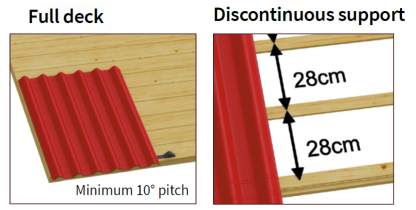
- Minimum pitch: 10 degrees
- Installation is possible on full deck or battens (full deck, OSB, plywood etc. is highly recommended).
- Pitches of > 5° - 10° : Full deck is required
- Pitches > 10° : Can be installed on battens with a maximum spacing of 28 cm
Installation Steps: ONDULINE EASYFIX
Step 1: Prepare the structure
A 21 mm thick minimum support is recommended. If you choose to use discontinuous support, the span between purlins/batten centers must be 28 cm.
Plan to lay sheets in the opposite direction to the prevailing winds.
Like all Onduline sheets, these roofing sheets can be installed over old asphalt shingles.
Step 2: Lay the sheets & Foam Fillers
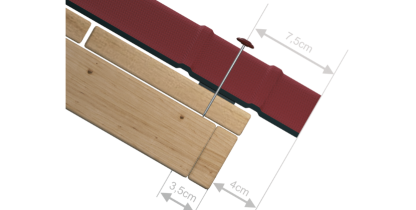
Lay ONDULINE EASYFIX® FOAM FILLER at 3,5 cm from the edge
of the OSB to secure watertighness and prevent animals to enter
into the roof space.
Start laying the 1st sheet starting from the bottom side of the roof, over the foam filler, with 4 cm overhang. The 1st row of fixing is positioned at 3,5 cm from the edge of the roof support. Fix together the sheet and the
foam filler to the support.
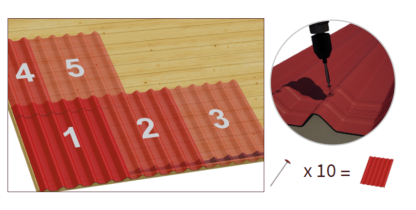
Step 3: Fix the sheets
10 fixings minimum should be used per sheet.
0n average, 10 fixings minimum should be used per sheet. Always fix on the top of corrugations, using Onduline®
fixings with special washer for safe waterproofing.
Step 4: Fixing the verge
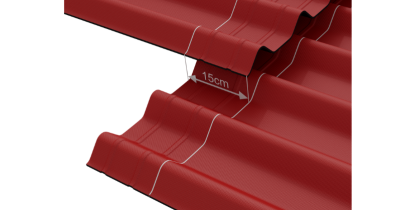
Stagger the rows, by starting the second row with a half sheet. Align overlapping lines to ensure perfect waterproofing. (Minimum overlap of 15 cm).
You can increase the overlap to avoid cutting the sheets.
Step 5: Secure the ridge
The aesthetics and wind uplift protection can be optimised by using the ONDULINE VERGE accessory, which is fixed first on the sidewall, then as well on the top of the corrugation.
Secure 6 fixings per verge.
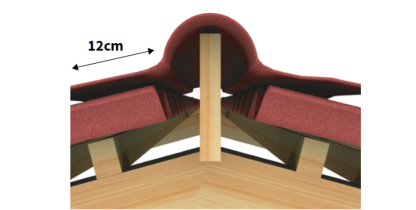
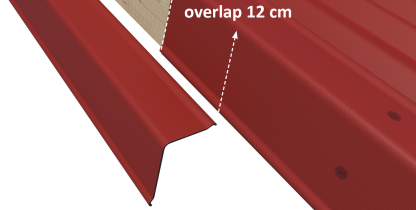
Step 6: Secure the ridge
Cover the ridge with ONDULINE RIDGE Piece fixed on each side of the roof, on top of each corrugation. The direction of the overlap is opposite to the direction of the prevailing winds.
Use a ridge batten to support the Onduline ridge piece as shown.
The ridge element has to overlap the ONDULINE EASYFIX COMPACT sheet by a minimum 12 cm.
Download the full installation steps below or watch the video
EASYFIX COMPACT Installation Conditions
- Minimum pitch: 10 degrees
- Installation is possible on full deck or battens (full deck, OSB, plywood etc. is highly recommended).
- Pitches of > 5° - 10° : Full deck is required
- Pitches > 10° : Can be installed on battens with a maximum spacing of 28 cm